
The bridges golf and country club Official scorecard
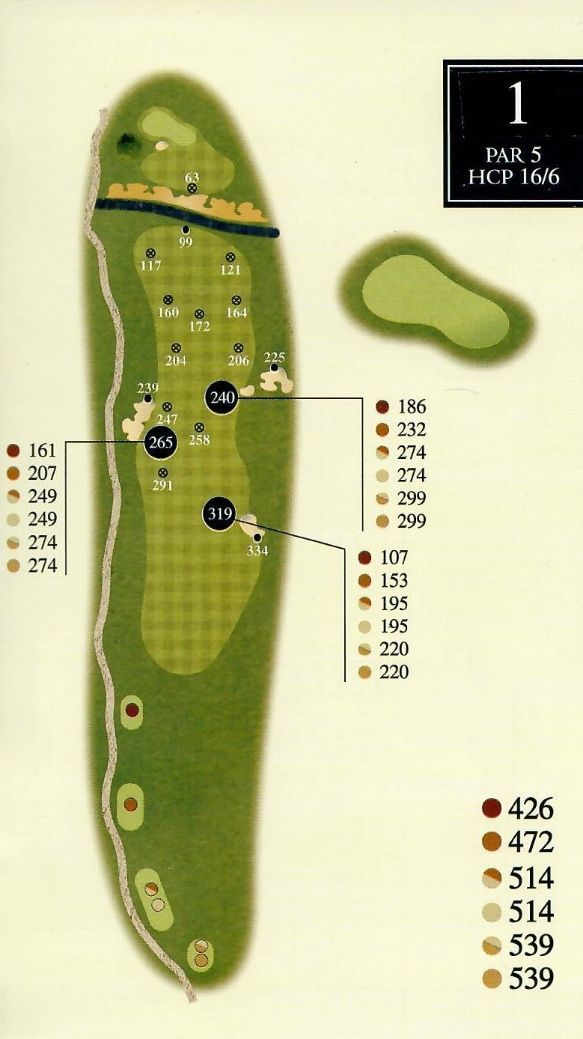
Hole #1
Par 5
HCP 17/9
Formerly the 10th hole, this par 5 eases players into the golf course. A generous landing area for your drive allows the golfer to hit a lay-up with a mid to short iron just shy of the Loutsenhizer Culvert or carry the penalty area with a fairway wood. The L-shaped green has a deep bunker at the bend to be avoided. This hole allows for under par scores, but a par on the opener is still a good start.
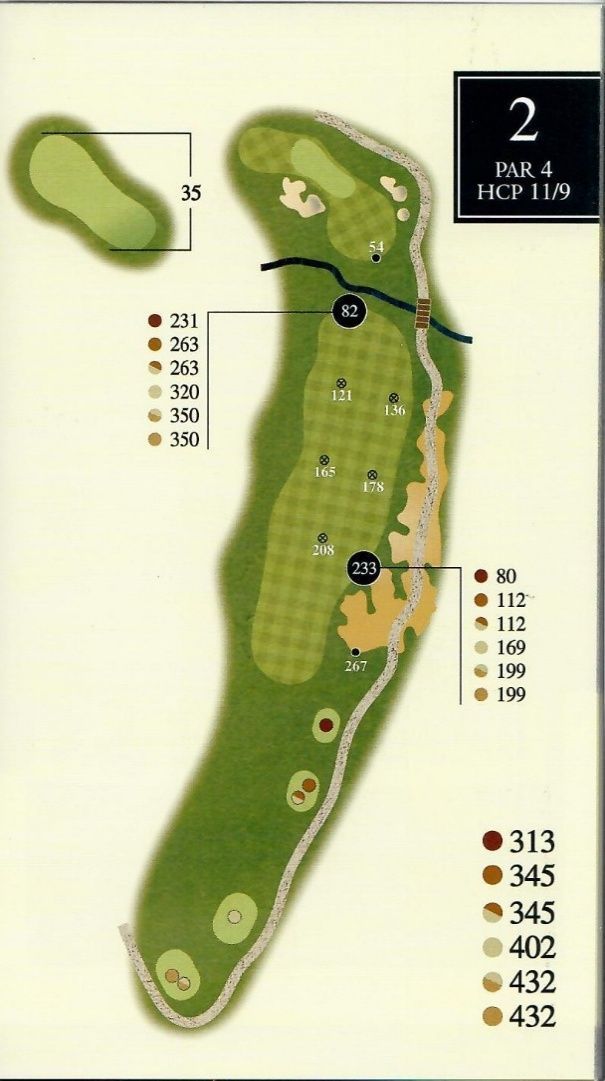
Hole #2
Par 4
HCP 5/5
Sharing a back tee box with #11, this short par 4 puts a premium on driving. Accurately navigating the internal out of bounds on the left and the red sand waste bunker on the right is paramount, but adding distance to the equation is a plus. The further down the fairway the ball stops, the more downhill the lie to an uphill green. The two-tier green sits perpendicular to the fairway, so distance control is a must.
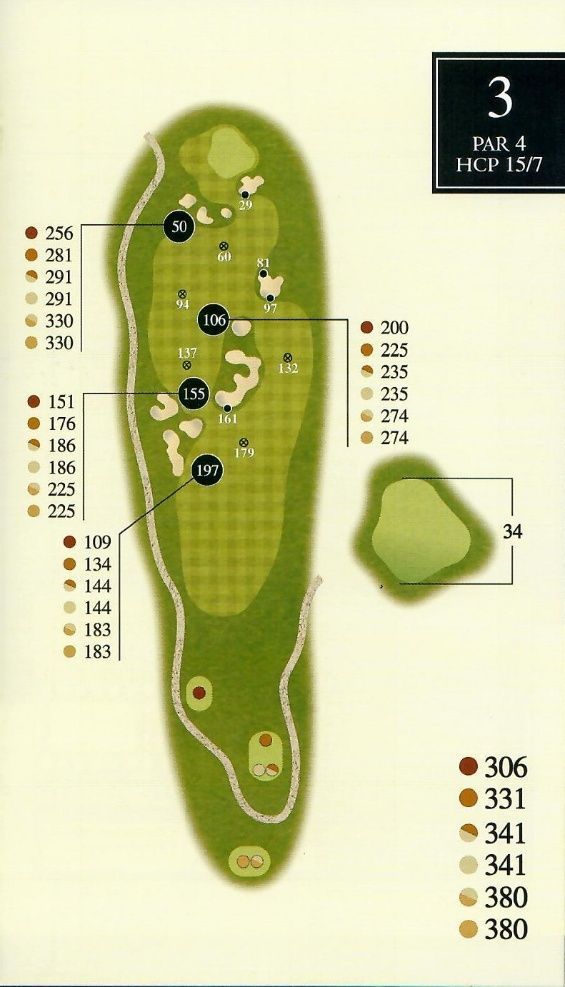
Hole #3
Par 4
HCP 15/7
This hole is a typical example of a Nicklaus Design golf course. Risk/reward abounds with your choice of club off the tee. A long, accurate driver could leave a flip wedge second. Or a more prudent choice of a fairway metal or hybrid could leave a fuller swing for an approach, but from a more level lie and from the fairway. The hole location on this tiered green should be a factor in deciding what club to hit from the tee.
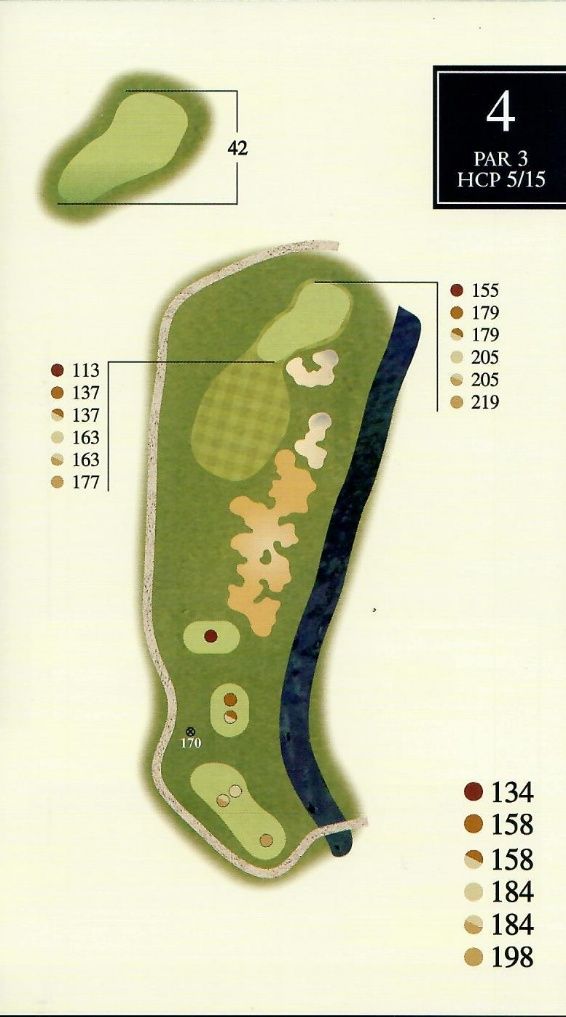
Hole #4
Par 3
HCP 11/13
As the first of our five Par 3’s, this is the start of the more difficult section of the outward nine. This redan style hole plays along the Loutsenhizer Canal and the 40-yard green sits at an angle to the tees, so pin location here can make a sizable difference in your club selection. Short is better than long as the green slopes heavily from back to front.
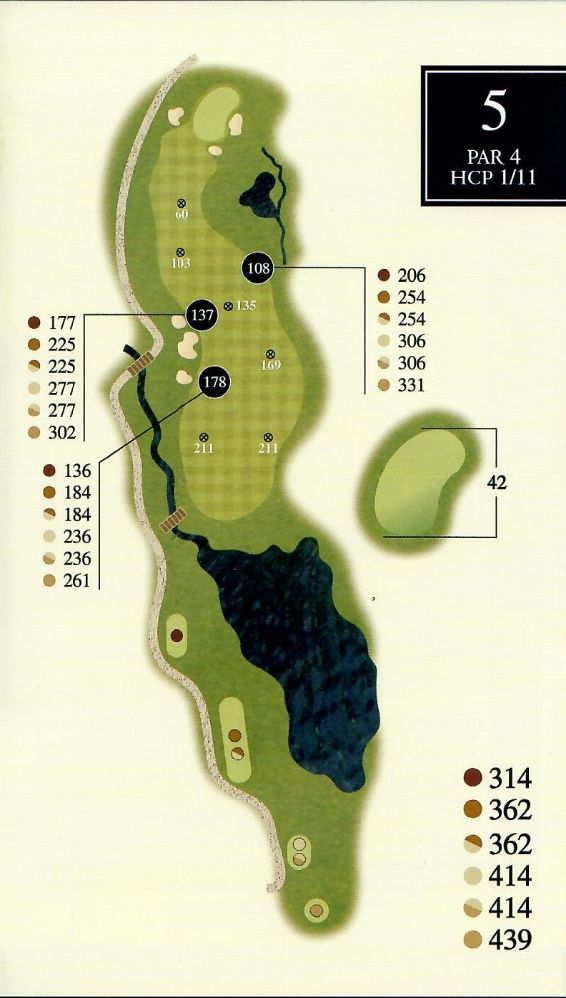
Hole #5
Par 4
HCP 1/1
The golfer shouldn’t let the scenic San Juans as a backdrop be a distraction to this very serious hole. As the #1 handicap hole, every shot requires the players full attention. A long, accurate drive that avoids the fairway bunkers on the left and the Montrose Arroyo on the right will leave a mid-iron approach to a kidney shaped green that plays slightly uphill.

Hole #6
Par 4
HCP 7/15
If the players’ drive can avoid the arroyo up the left side of this hole, a well-placed drive should set up a relatively easy approach to a green that sits perpendicular to the fairway and is guarded by a lone bunker in front of the middle of the green. This is another hole that short is better than long.
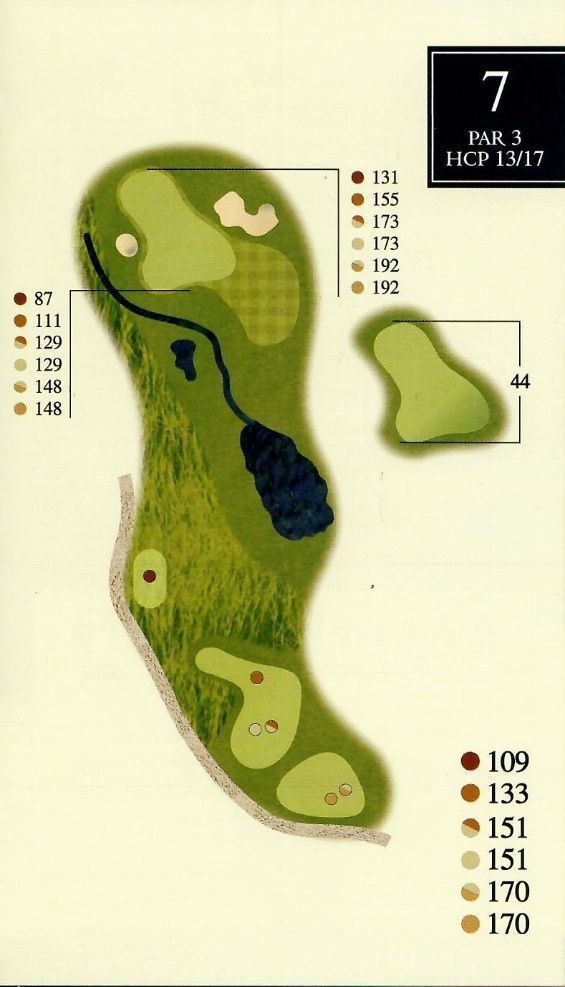
Hole #7
Par 3
HCP 13/17
This beautiful par 3 features a creek along the front and left sides of the green. Center of the green is a great position to putt from no matter the hole location. Chipping from the bailout area short right of the green isn’t the most difficult shot, but the prudent golfer should avoid the bunker guarding the right side of this green, negating the stress of hitting toward the creek beyond the hole location.

Hole #8
Par 4
HCP 3/3
Pure target golf is the requirement for success on this hole. The right edge of the second fairway bunker on the left is a great start line for your drive. From there, a mid to short iron approach to the middle of the green (favoring the left a bit to avoid the pond on the right) leaves a good chance at a par regardless of the hole location.
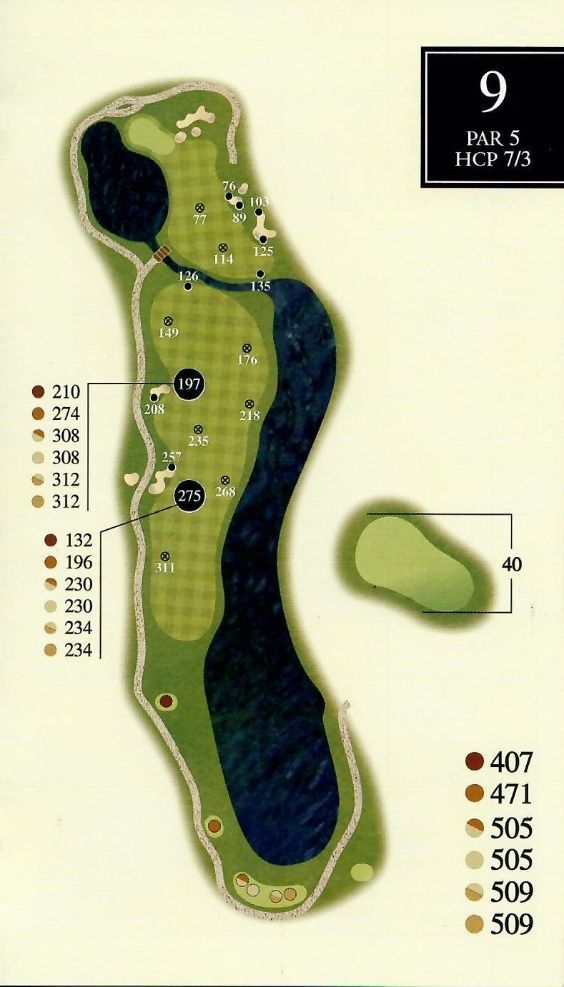
Hole #9
Par 5
HCP 9/11
Long hitters can reach this par 5 green in two, but not without pause to determine the risk/reward factor. Water protecting the left side of the green and a series of bunkers to the right of the green require precise distance control as well as direction to reap the benefits of going for it in two. In some cases, discretion is the better part of valor!
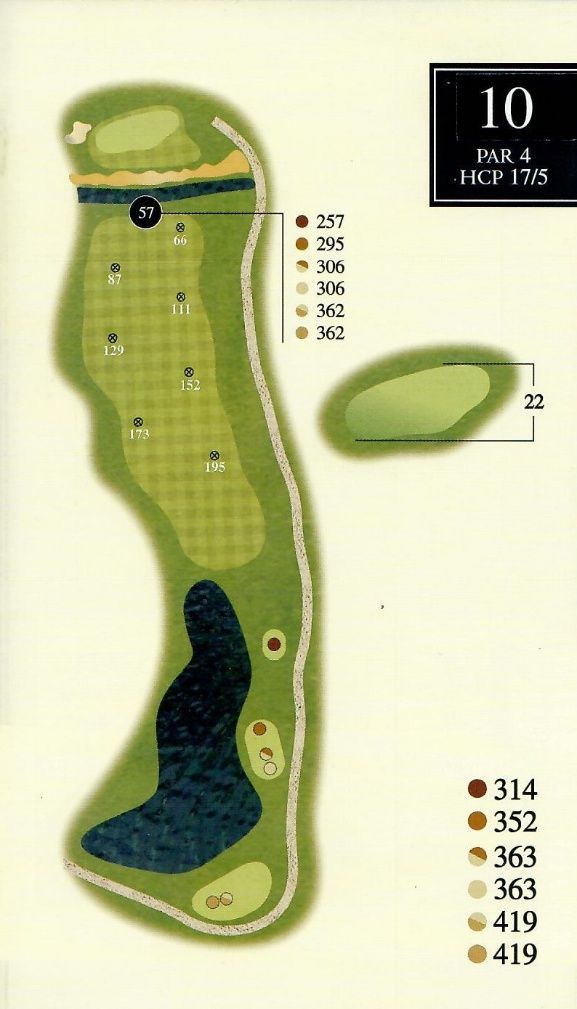
Hole #10
Par 4
HCP 18/10
After stopping at The General Store for refreshments, this easier of the par 4’s gives golfers a chance to “get one back” from the course. Generous landing area for the drive should boost your confidence to swing away from the tee. This is another green that sits perpendicular to the fairway. The required approach shot needs to carry the Loutsenhizer Culvert and a waste bunker, but lands softly as to not run through the green. Birdies are available but big numbers can jump up just as easy if golfers don’t play smart.
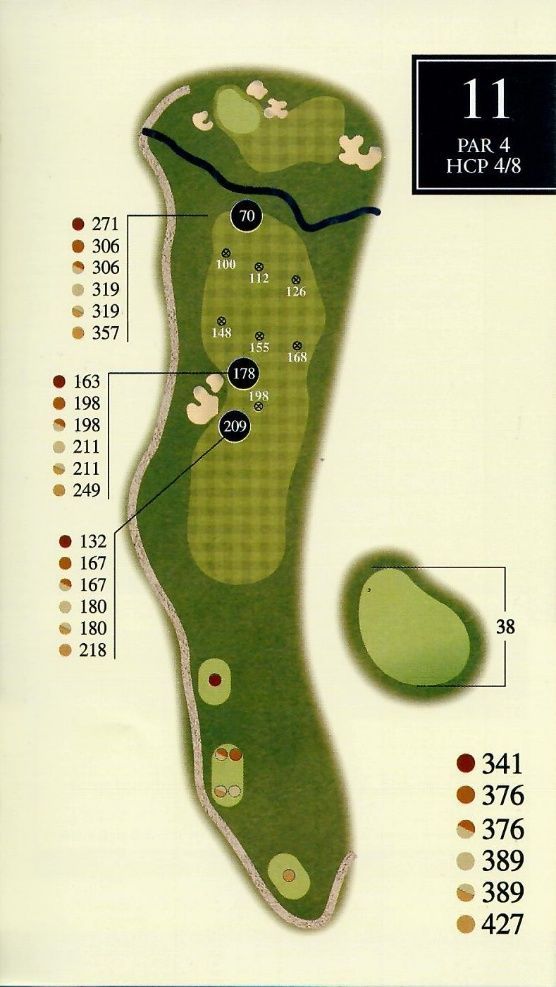
Hole #11
Par 4
HCP 6/4
Golfers get a glimpse of this hole when they played #2 earlier in the round. The edges of the fairway are slightly mounded so most drives tend to filter back to the middle of the fairway. The top priority is to avoid the fairway bunkers on the left. The green is uphill from the fairway and the Montrose Arroyo can very much be in play on a mishit approach. NOTE: THE INTERNAL OUT OF BOUND UP THE RIGHT OF THE FAIRWAY IS IN PLAY FOR #2 ONLY.
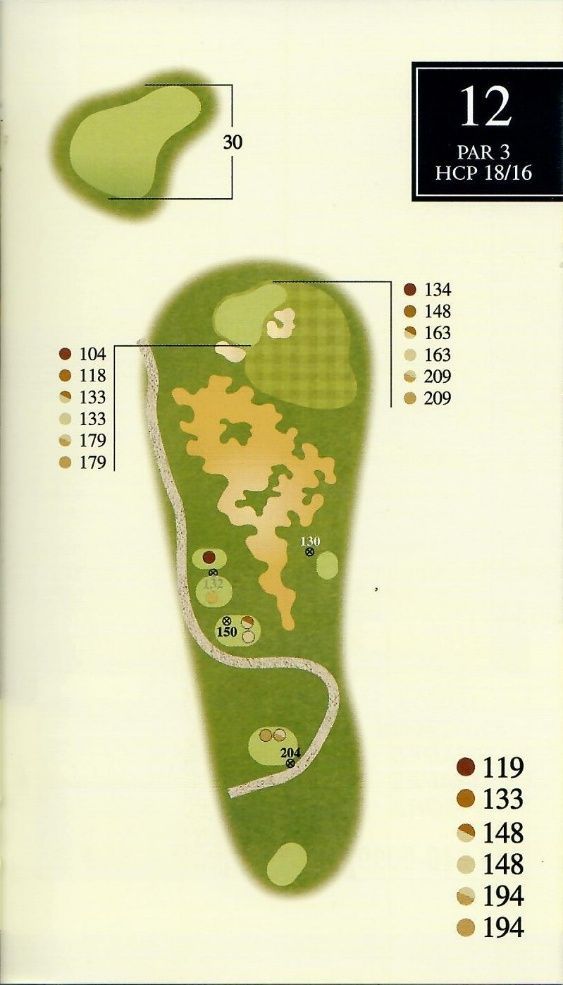
Hole #12
Par 3
HCP 16/12
While the hole handicap rates this as our easiest par 3, don’t underestimate its challenge. Playing true to the yardage, certain pin locations can tempt the golfer to play too aggressively. Front pins are guarded by bunkers on both sides and a wayward tee shot to a back right pin can be costly. Middle of the green is never a terrible place to putt from on this kidney bean shaped green.
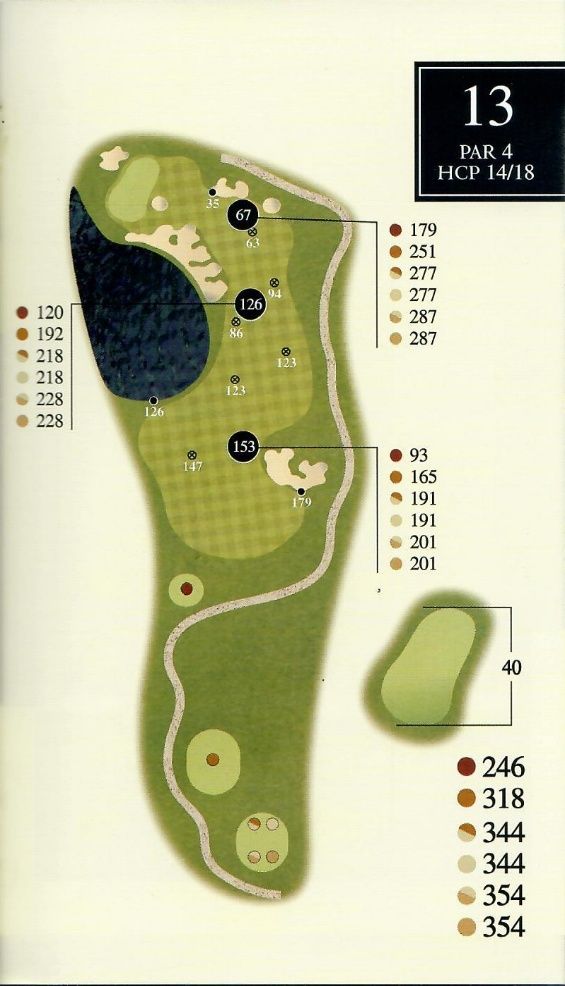
Hole #13
Par 4
HCP 8/18
One of the shortest par 4 on the course, long hitters often contemplate driving the green. Precision players only need a mid to long iron or hybrid to keep the ball short right of the water guarding the left side of the fairway. A long fairway bunker sits some 30 to 40 yards back from the green and requires an always dangerous long bunker shot to the green. There is a sizable hump that divides the green into two sections and if the golfer misses the correct side of the hump, there is no guarantee of a two putt.
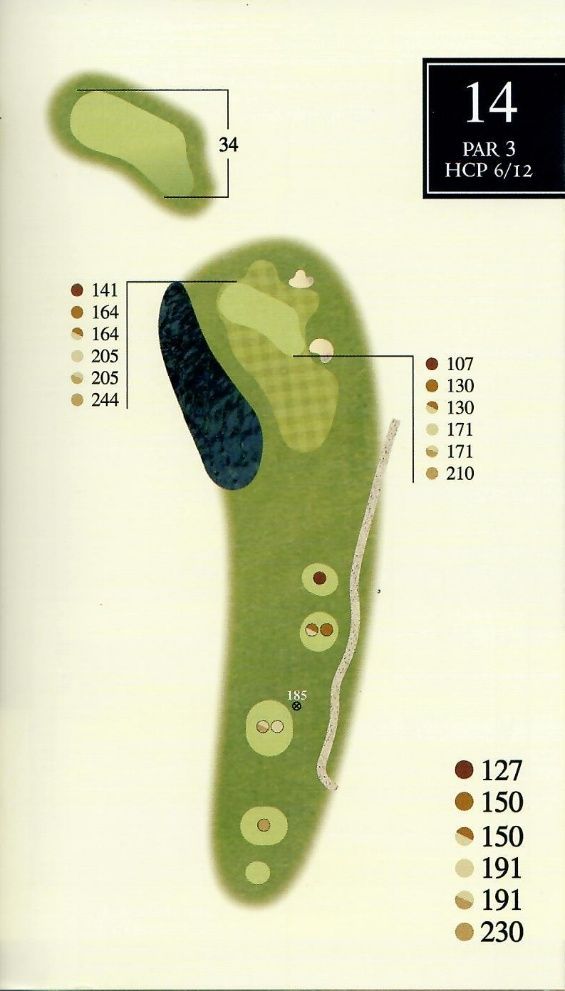
Hole #14
Par 3
HCP 12/14
This is the longest of the par 3’s and requires an exact tee shot to the correct tier with the hole location. Water guards the left side of the green. In true Nicklaus style, there are some bailout areas long and to the right of the green that are not too difficult to chip from. A front hole location is most accessible from the tee as it normally sits in a slight “bowl” and is far enough away from the penalty areas and natural areas surrounding the green.
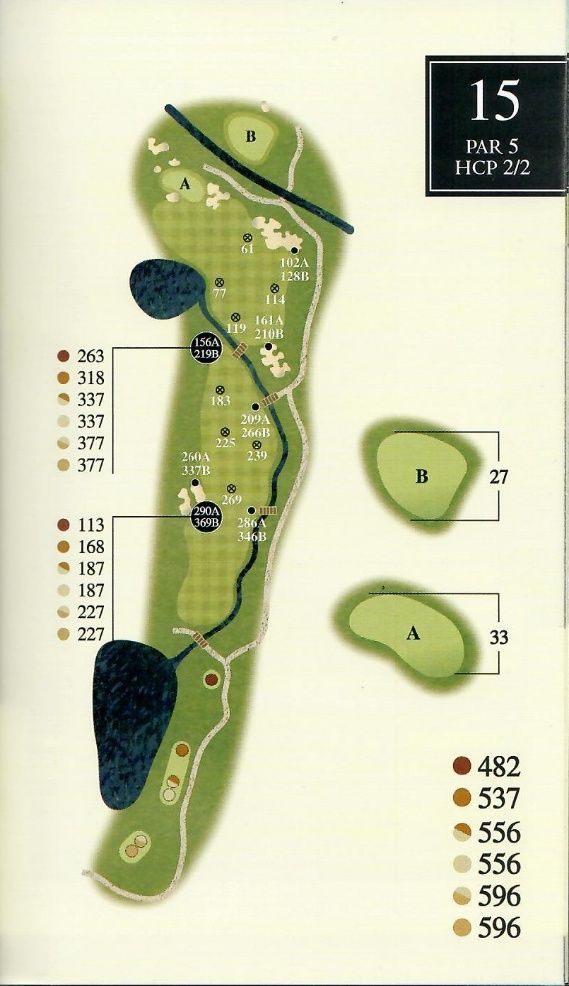
Hole #15
Par 5
HCP 2/2
Overall driving is at a premium on this par 5. Water guards the right side of the fairway and there are two fairway bunkers with high front edges. By favoring the left side of the fairway with the tee shot, the ball will find a “speed slot” that kicks the ball forward and slightly right into the center of the fairway. This is a green light location to go for the green in two. The green is guarded by several bunkers but none so penal that a decent shot should escape them to the green. Conservative play should result in a par, but an aggressive play could make up some strokes on your score!
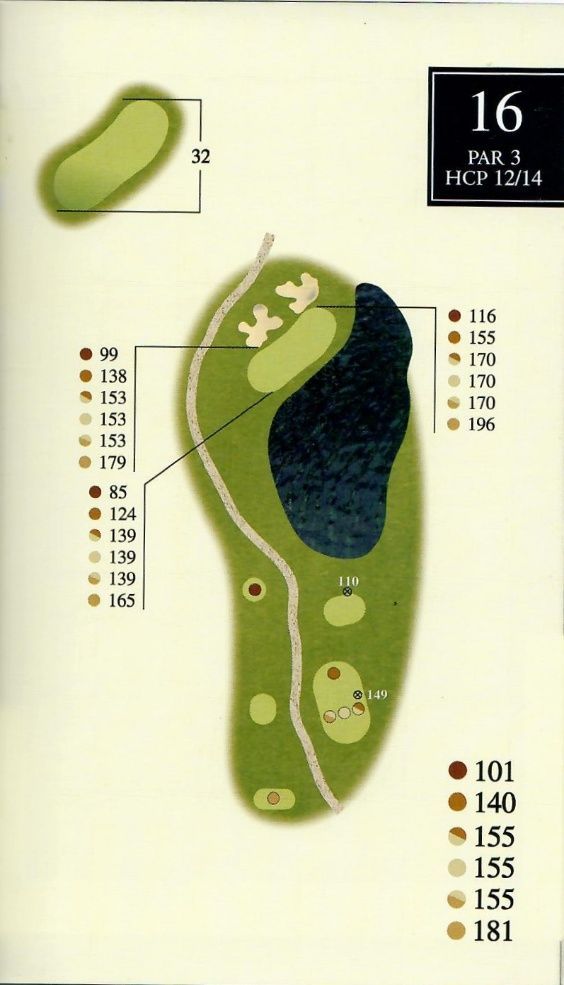
Hole #16
Par 3
HCP 10/16
This last of the par 3’s emphasizes the golfer’s ability to execute a controlled distance swing from the tee. Bunkers long and left and a pond short and right of the green requires exact yardage control to a green that sits at an angle to the tee boxes. Depending on the hole location, there could be as much as a three-club difference on the tee shot. A hump near the middle of the green divides it into two sections, so there is no easy two putt if the golfer misses in the wrong section.
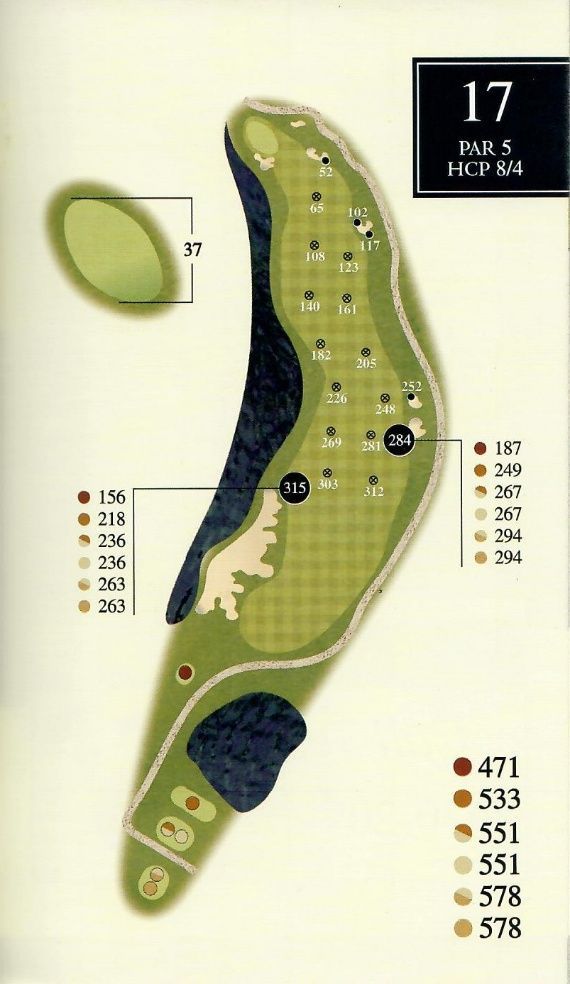
Hole #17
Par 5
HCP 14/8
Of all the holes on the course, this par 5 begs for smart, sensible play. Water and bunkers frame the fairway and require avoidance at all cost to set up any chance of a scoring opportunity. The green has a ridge that runs at an angle from front right to middle left, creating two very distinct levels to the putting surface. There are definitely more under par scores made the “old fashioned” way as a three-shot par five.
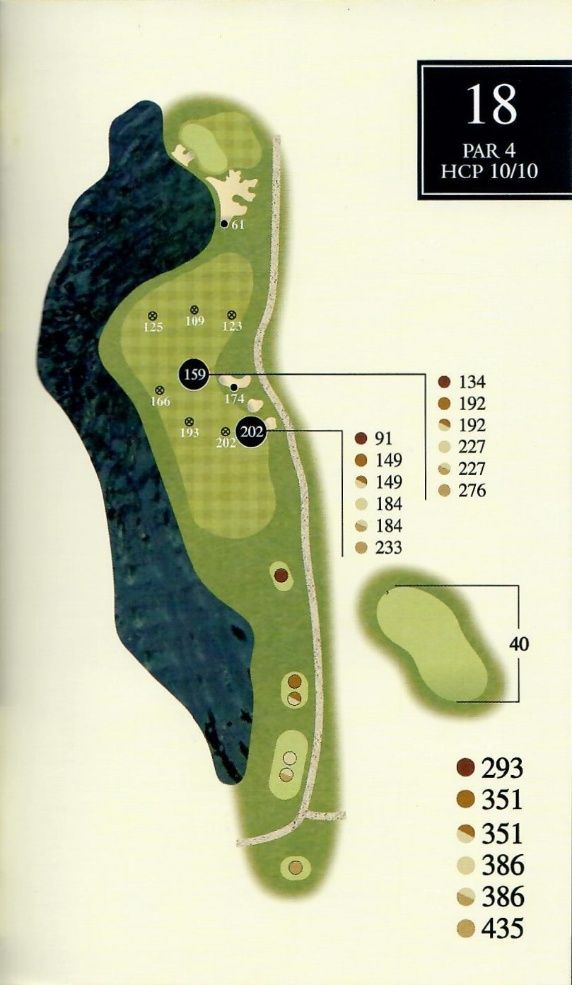
Hole #18
Par 4
HCP 4/6
Many a match has been won or lost on this deceptive closing hole. The lake left of the fairway makes the golfer favor the right off the tee. The cluster of bunkers up the right are a good aim point, but the golfer needs to be brave enough to hit plenty of club to carry them but not run into the water that fronts the edge of the fairway. The green is long and thin with two tiers. There is a bail out area of fairway cut to the right, but the chip requires the golfer to stare at the lake positioned very close to the left edge of the green.